一、基本框架
1.1 驱动的分离分层
- 分离:把经常要更改的东西抽出来(硬件);把相对稳定的软件部分抽出来。
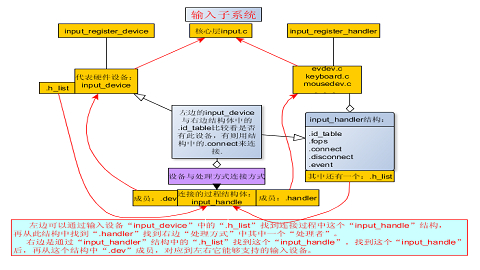
- 分层:如input.c 向上提供统一给 APP 操作的统一接口。每一层专注于自已的事件。

二、实例编写(s3c2440)
2.1 LED平台设备
①设置并注册一个platform_device结构体
1
2
3
4
5
6
7
8
9
10
11
| static struct platform_device led_dev = {
.name = "my_led",
.id = -1,
.num_resources = ARRAY_SIZE(led_resources),
.resource = led_resources,
.dev = {
.release = led_dev_release,
},
};
......
platform_device_register(&led_dev);
|
② .resource = led_resources中有led的硬件信息
1
2
3
4
5
6
7
8
9
10
11
12
| static struct resource led_resources[] = {
[0] = {
.start = 0x56000050,
.end = 0x56000050 + 8 - 1,
.flags = IORESOURCE_MEM,
},
[1] = {
.start = 4,
.end = 4,
.flags = IORESOURCE_IRQ,
},
}
|
③平台设备注册的过程
1
2
3
| platform_device_register (&led_dev);
-->platform_device_add(&led_dev);
-->device_add(&led_dev);
|
④完整代码如下:
1
2
3
4
5
6
7
8
9
10
11
12
13
14
15
16
17
18
19
20
21
22
23
24
25
26
27
28
29
30
31
32
33
34
35
36
37
38
39
40
41
42
43
44
45
46
47
48
49
50
51
52
53
54
55
56
57
58
59
60
| #include <linux/module.h>
#include <linux/version.h>
#include <linux/init.h>
#include <linux/kernel.h>
#include <linux/types.h>
#include <linux/interrupt.h>
#include <linux/list.h>
#include <linux/timer.h>
#include <linux/init.h>
#include <linux/serial_core.h>
#include <linux/platform_device.h>
static struct resource led_resources[] = {
[0] = {
.start = 0x56000050,
.end = 0x56000050 + 8 - 1,
.flags = IORESOURCE_MEM,
},
[1] = {
.start = 4,
.end = 4,
.flags = IORESOURCE_IRQ,
},
[2] = {
.start = 5,
.end = 5,
.flags = IORESOURCE_IRQ,
},
};
static void led_dev_release(struct device * dev)
{
printk("led_dev_release , remove led_dev\n");
}
static struct platform_device led_dev = {
.name = "my_led",
.id = -1,
.num_resources = ARRAY_SIZE(led_resources),
.resource = led_resources,
.dev = {
.release = led_dev_release,
},
};
static int led_dev_init(void)
{
platform_device_register(&led_dev);
return 0;
}
static void led_dev_exit(void)
{
platform_device_unregister(&led_dev);
}
module_init(led_dev_init);
module_exit(led_dev_exit);
MODULE_LICENSE("GPL");
|
2.2 LED平台驱动
①分配、设置、注册一个 platform_driver 结构体。 注意:平台总线的match 函数比较的是”平台设备”和”平台驱动”的名字,所以两边名字要相同,这样才会认为这个 drv 能支持这个 dev。才会调用平台驱动里面的”probe”函数。
1
2
3
4
5
6
7
8
9
10
11
12
13
14
|
struct platform_driver leds_device_driver = {
.probe = led_probe,
.remove = led_remove,
.driver = {
.name = "my_led",
}
};
static int led_drv_init(void)
{
platform_driver_register(&leds_device_driver);
return 0;
}
|
②构造平台驱动中的“probe”函数
1
2
3
4
5
6
| static int led_probe(struct platform_device *pdev)
{
return 0;
}
|
③构造平台驱动中的“remove”函数:做与“probe”相反的事情
1
2
3
4
5
6
| static int led_remove(struct platform_device *pdev)
{
return 0;
}
|
④剩下的就和字符设备一样编写open、write;比如write根据probe中获取到的硬件信息去操作这个灯。完整代码如下:
1
2
3
4
5
6
7
8
9
10
11
12
13
14
15
16
17
18
19
20
21
22
23
24
25
26
27
28
29
30
31
32
33
34
35
36
37
38
39
40
41
42
43
44
45
46
47
48
49
50
51
52
53
54
55
56
57
58
59
60
61
62
63
64
65
66
67
68
69
70
71
72
73
74
75
76
77
78
79
80
81
82
83
84
85
86
87
88
89
90
91
92
93
94
95
96
97
98
99
100
101
102
103
104
105
106
107
108
109
110
111
112
113
114
115
116
117
118
119
120
121
122
| #include <linux/module.h>
#include <linux/version.h>
#include <linux/init.h>
#include <linux/fs.h>
#include <linux/interrupt.h>
#include <linux/irq.h>
#include <linux/sched.h>
#include <linux/pm.h>
#include <linux/sysctl.h>
#include <linux/proc_fs.h>
#include <linux/delay.h>
#include <linux/platform_device.h>
#include <linux/input.h>
#include <linux/irq.h>
#include <asm/io.h>
#include <linux/uaccess.h>
static int major;
static struct class *led_platform_class;
static struct class_device *led_platform_dev;
static volatile unsigned long *gpio_con = NULL;
static volatile unsigned long *gpio_dat = NULL;
static int pin;
static int led_platform_open(struct inode *inode, struct file *file)
{
printk("led_platform_open\n");
*gpio_con &= ~(0x3<<(pin*2));
*gpio_con |= (0x1<<(pin*2));
return 0;
}
static ssize_t led_platform_write(struct file *file, const char __user *buf, size_t count, loff_t * ppos)
{
int val;
int ret;
ret = copy_from_user(&val, buf, count);
if(val == 1)
*gpio_dat &= ~( 1 << pin );
else
*gpio_dat |= ( 1 << pin );
return 0;
}
static struct file_operations led_fops = {
.owner = THIS_MODULE,
.open = led_platform_open,
.write = led_platform_write,
};
static int led_probe(struct platform_device *pdev)
{
struct resource *res;
printk("led_probe , find led_devce\n");
res = platform_get_resource(pdev,IORESOURCE_MEM, 0);
gpio_con = ioremap(res->start, res->end - res->start + 1);
gpio_dat = gpio_con + 1;
res = platform_get_resource(pdev, IORESOURCE_IRQ, 1);
pin = res->start;
major = register_chrdev(0, "my_leds", &led_fops);
led_platform_class = class_create(THIS_MODULE, "platform");
led_platform_dev = class_device_create(led_platform_class, NULL, MKDEV(major, 0), NULL, "led_platform");
return 0;
}
static int led_remove(struct platform_device *pdev)
{
printk("led_remove , remove led_device\n");
unregister_chrdev(major, "my_leds");
class_device_unregister(led_platform_dev);
class_destroy(led_platform_class);
iounmap(gpio_con);
return 0;
}
struct platform_driver leds_device_driver = {
.probe = led_probe,
.remove = led_remove,
.driver = {
.name = "my_led",
}
};
static int led_drv_init(void)
{
platform_driver_register(&leds_device_driver);
return 0;
}
static void led_drv_exit(void)
{
platform_driver_unregister(&leds_device_driver);
}
module_init(led_drv_init);
module_exit(led_drv_exit);
MODULE_LICENSE("GPL");
|
注意:不管先注册“平台设备”还是先注册“平台驱动”,都会调用bus总线下的mach函数来通过名字比较有无匹配者,匹配成功的话就会调用“平台驱动”中的probe函数。以后我们要切换操作不同的灯的时候只需要更改platform_device中的硬件资源,也就相当于只要更改“平台设备”的代码。在大型项目上采用这种分离分层的思想,提取出经常要更改的代码和比较稳定的代码,这样代码的结构就很优美。
现在内核支持设备树,不用自己注册平台设备,只需操作设备树即可,内核会将设备树转换成平台设备。
2.3 测试APP
1
2
3
4
5
6
7
8
9
10
11
12
13
14
15
16
17
18
19
20
21
22
23
24
25
26
27
28
29
30
31
32
33
34
35
36
37
38
39
40
41
42
43
| #include <sys/types.h>
#include <sys/stat.h>
#include <fcntl.h>
#include <stdio.h>
int main(int argc, char **argv)
{
int fd;
int val;
fd = open("/dev/led_platform", O_RDWR);
if (fd < 0){
printf("can't open /dev/led_platform!\n\r");
return 0;
}
if (argc != 2){
printf("Usage : %s <ON|OFF>\n",argv[0]);
return 0;
}
if(strcmp(argv[1],"ON") ==0)
val = 1;
else if(strcmp(argv[1],"OFF") ==0)
val = 0;
else{
printf("Usage : %s <ON|OFF>\n",argv[0]);
return 0;
}
write(fd, &val, 4);
return 0;
}
|